Customize Consent Preferences

We use cookies to help you navigate efficiently and perform certain functions. You will find detailed information about all cookies under each consent category below.

The cookies that are categorized as "Necessary" are stored on your browser as they are essential for enabling the basic functionalities of the site. ... 

Always Active

Necessary cookies are required to enable the basic features of this site, such as providing secure log-in or adjusting your consent preferences. These cookies do not store any personally identifiable data.

No cookies to display.

Functional cookies help perform certain functionalities like sharing the content of the website on social media platforms, collecting feedback, and other third-party features.

No cookies to display.

Analytical cookies are used to understand how visitors interact with the website. These cookies help provide information on metrics such as the number of visitors, bounce rate, traffic source, etc.

No cookies to display.

Performance cookies are used to understand and analyze the key performance indexes of the website which helps in delivering a better user experience for the visitors.

No cookies to display.

Advertisement cookies are used to provide visitors with customized advertisements based on the pages you visited previously and to analyze the effectiveness of the ad campaigns.

No cookies to display.

Call us @ +1 508-737-1615

Introduction

Manage Salesforce module allows an admin user to create a connection between Salesforce and Successful Channels application to pull out filtered data from salesforce standard objects to the Successful Channels application.

Features/Components

Three main features can be managed by the admin user given as follows:

  • Salesforce Login
  • Salesforce Sync
  • Salesforce Diagnostic Report
  • Salesforce Filter

1.2 Salesforce Login

Salesforce Login
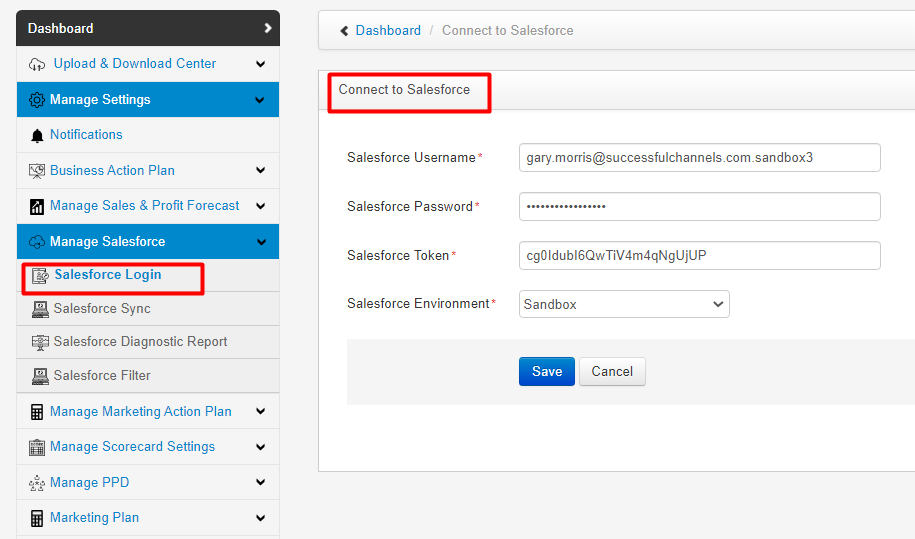
What The Salesforce Login feature allows an admin user to create a connection between the Salesforce and Successful Channels application.
How How to create a connection between Salesforce and Successful Channels application:
  • In the left navigation, click on Manage Salesforce>Salesforce Login.
  • Enter the Salesforce username in the given textbox.
  • Enter the Salesforce account password.
  • Enter the Salesforce security token in the third textbox. Admin user can get this security token from the Salesforce Account Setting.
  • Select the Salesforce Environment from the dropdown list. It is of three types: Sandbox, Production, and Developer.
  • Click on the Save button for creating the connection.
  • Click on the Cancel button for cancelling the connection.
Note: All the required fields are mandatory to create a connection between the Salesforce account and the Successful Channels application.

1.3 Salesforce Sync

Salesforce Sync
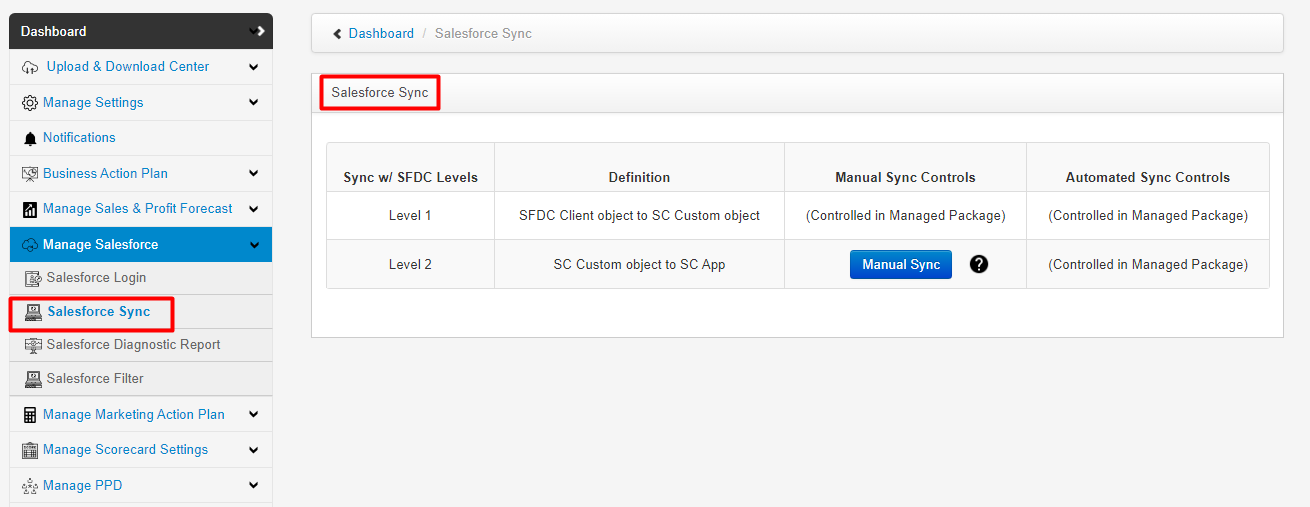
What This feature shows the different levels of sync to pull out the data from salesforce client objects to the Successful Channels application.
  • Level 1 Sync- Data moving from Salesforce Client Objects to SC Custom Objects.
  • Level 2 Sync- Data moving from SC Custom objects to Successful Channels application.
How
  • In the left navigation, click on Manage Salesforce>Salesforce Sync.
  • Click on the Manual Sync button to run the comprehensive sync. It will update all the records from the SC Custom objects to the SC application.

1.4 Salesforce Diagnostic Report

Salesforce Diagnostic Report
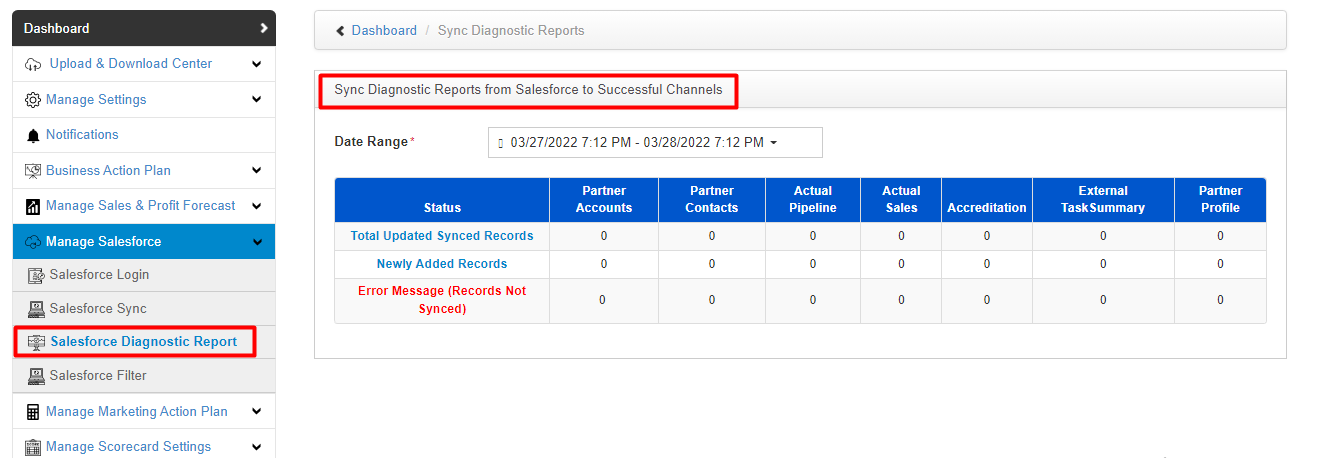
What Salesforce diagnostic report shows the numbers of records synced from SC Custom Objects to Successful Channels application for every SC object.
How
  • In the left navigation, click on Manage Salesforce>Salesforce Diagnostic Report.
  • In the Total Updated Synced Records row, it shows the numbers of most recently updated records (belonging object) that were already existing in the SC application.
  • In the Newly Added Records row, it shows the numbers of most recently added records for the belonging object.
  • In the Error Message(Records not synced) row, it shows the numbers of records that did not add or updated due to any insufficient details.

Why does an error occur?

Here are the possible reasons behind the occurrence of an error in the records syncing for every object.
  1. For Partners Accounts
  2. If anything of the given fields or details is wrong or insufficient to sync the desired record, an error may occur:
    • Partner Name
    • Partner Salesforce ID
    • Country
    • State
    • Postal Code
  3. For Partners Contacts
    • Partner Salesforce ID
    • Contact ID
    • First Name
    • Last Name
  4. For Actual Pipeline
    • Deal ID
    • Estimated Close Date
    • Amount
    • Pipeline Level
    • Partner Salesforce ID
    • Date of Deal
    • Opportunity Type
    • Record Type
  5. For Actual Sales
    • Partner Salesforce ID
    • Pipeline Level
    • Transaction Date
    • Transaction $ Value
    • Transaction Date
    • Deal Type
  6. External Task Summary
    • Partner Account ID
    • Actual Completion Date
    • Planned Completion Date
    • Completion Status
    • Task ID
    • Task Title
    • Task Description
  7. Partner Profile
    • Partner Account ID
    • If Data type fields are not mapped correctly with the data type source.

1.5 Salesforce Filter

Salesforce Filter
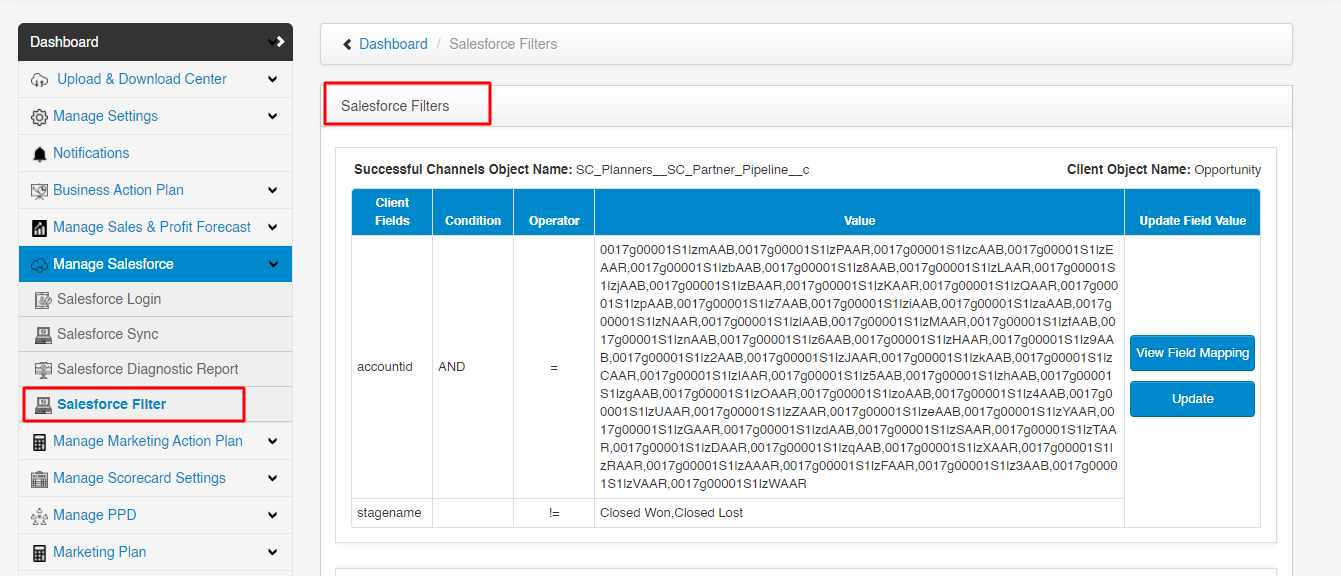
What The Salesforce Filter feature allows an admin user to modify or remove the value of the filter set by the client for the Salesforce client objects. Based on these filters, data will be populated in the Successful Channels application.
How
    1. How to modify a filter or add a new value for the filter:
      • In the left navigation, click on Manage Salesforce>Salesforce filter.
      • If the user wants to modify the filter or add a new value in the filter for an object, click on the Update button in the Update Field Value column.
      • Enter the appropriate and valid value in the given textbox that the user wants to add.
    2. How to remove a value from the filter:
      • In the left navigation, click on Manage Salesforce>Salesforce filter.
      • If the user wants to remove a value from the filter for an object, click on the Update button in the Update Field Value column.
      • Enter the appropriate and valid value in the given textbox that the user wants to remove.
      • Click on the Remove button.
    3. How to view field mapping between Salesforce standard objects and the managed package custom object:
      • In the left navigation, click on Manage Salesforce>Salesforce filter.
      • Click on the Field View Mapping button in the Update Field Value column for the object that the user wants to view field mapping.
      • User will be able to view field mapping between salesforce selected fields and Successful Channels selected fields.

© 2025 Successful Channels Inc.