Customize Consent Preferences

We use cookies to help you navigate efficiently and perform certain functions. You will find detailed information about all cookies under each consent category below.

The cookies that are categorized as "Necessary" are stored on your browser as they are essential for enabling the basic functionalities of the site. ... 

Always Active

Necessary cookies are required to enable the basic features of this site, such as providing secure log-in or adjusting your consent preferences. These cookies do not store any personally identifiable data.

No cookies to display.

Functional cookies help perform certain functionalities like sharing the content of the website on social media platforms, collecting feedback, and other third-party features.

No cookies to display.

Analytical cookies are used to understand how visitors interact with the website. These cookies help provide information on metrics such as the number of visitors, bounce rate, traffic source, etc.

No cookies to display.

Performance cookies are used to understand and analyze the key performance indexes of the website which helps in delivering a better user experience for the visitors.

No cookies to display.

Advertisement cookies are used to provide visitors with customized advertisements based on the pages you visited previously and to analyze the effectiveness of the ad campaigns.

No cookies to display.

Call us @ +1 508-737-1615

Introduction

Manage users feature provides the access to an admin user to manage Channel Teams and Partner Contacts. User can add, edit and delete Channel Team Members and Partner Contacts.

Features/Components

Two main features can be managed by the admin user given as follows:

  • Manage Channel Team
  • Manage Partner Contacts

1.2.1 Manage Channel Team

Manage Channel Team
What The Manage Channel Team feature allows the admin user to add, edit or delete any Channel Team member.
How
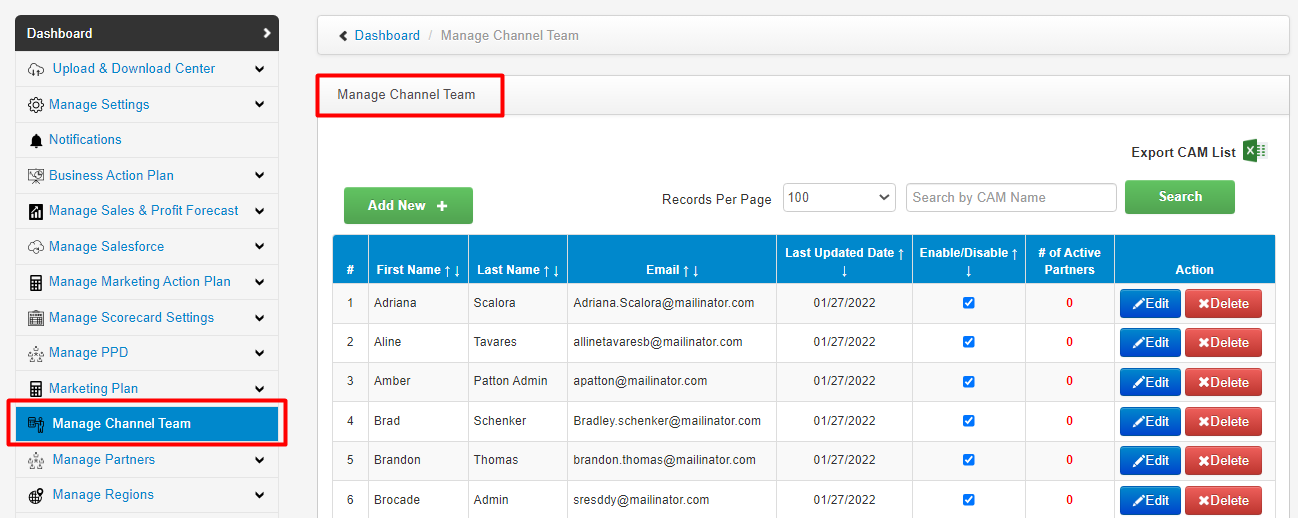
  1. Add a Channel Team Member:
    • In the left navigation, click on Manage Channel Team.
    • Click on the Add New button.
    • Enter the First Name(Required) in the first textbox.
    • Enter the Last Name(Required) in the second textbox
    • Enter the Title (Not mandatory) for the Channel Team Member.
    • Select Channel Team Member Role(Mandatory) from the dropdown. Admin user can select only one three i.e; CAM Role, Director Role, CAM, and Director Role.
      1. If the admin user selects CAM, the Assign Primary Region dropdown will be enabled and the user will have to select a primary region from the dropdown list (mandatory).
      2. If the admin user selects Director Role, a new field Are you a director for Region Level? will be enabled with different level Regions i.e., R1, R2 & R3. User can select only one radio button out of three for the regional level. Whatever the radio button user selects, the user will have to assign the region (single or multiple) for the selected level (mandatory). CAM with only the Director role will not have any Partner under it so that’s why Assign Primary Region Dropdown is not displaying.
      3. If the admin user selects CAM and Director Role, the two new fields will be enabled: Are you a director for Region Level? with different level Regions i.e., R1, R2 & R3, and the second field will be Assign Primary Region. User can select only one radio button out of three for the regional level. Whatever the radio button user selects, the user will have to assign the region (single or multiple) for the selected level (mandatory). Admin user also needs to select a primary region.
    • User can check the checkboxes for Approve Plans and View/Edit Business Plan.
    • Enter the Company Name, Address 1, Address 2, City, State, Zip, Country, Mobile No. (With Country code), and Landline No. (With Country code).
    • Enter the Email ID (mandatory).
    • Enter the Primary CAM ID# (mandatory and it must be unique for every Channel Team Member)
    • Enter Secondary CAM ID#.
    • User can either generate the password by just clicking on Generate button or type the required password
    • Send Password Notification checkbox- If the user checks this, the generated password will be sent to the registered Email ID.
    • Click on the Submit button.
  2. Edit a Channel Team Member:
    • In the left navigation, click on Manage Channel Team.
    • Click on the Edit button in the Action column.
    • Make the desired changes and hit the Submit button.
  3. Delete a Channel Team Member:
    • In the left navigation, click on Manage Channel Team.
    • Click on the Delete button in the Action column.
  4. Enable/Disable a Channel Team Member for the CAM dashboard by checking/unchecking the checkbox given in the Channel Team Member table. Disabled CAM user will not be able to log in to the CAM dashboard.
  5. Search a Channel Team Member by searching the First or Last Name and hitting the Search Button.
  6. Export the CAM list by clicking on the Excel icon the file will be exported to the user’s device for both active and inactive Channel Team Members.

1.2.2 Manage Partner Contacts

Manage Partner Contacts
What The Manage Partner Contacts feature allows the admin user to add, edit or delete any Partner Contact.
How
  1. 1. Add a Partner Contact:
    • In the left navigation, click on Manage Partners>Manage Partner Contacts.
    • Click on the Add New button.
    • Enter the First Name(Required) in the first textbox.
    • Enter the Last Name(Required) in the second textbox.
    • Enter the Email ID (mandatory).
    • Enter Address 1, Address 2, Title, City, State, Zip, Country, Phone 1, and Phone 2.
    • Enter the Primary Contact Id (mandatory and it must be unique for every Partner Contact)
    • Enter Secondary Contact Id.
    • Select Partner Name (Required) from the dropdown. When the user will select a partner, another field Select Partner Division will be enabled and the user will have to select a division (mandatory).
    • Send Password Notification checkbox- If the user checks this, the generated password will be sent to the registered Email ID. (only after hitting the Save button)
    • Click on the Save button.
  2. Edit a Partner Contact::
    • In the left navigation, click on Manage Partners>Manage Partner Contacts.
    • Click on the Edit button in the Action column.
    • Make the desired changes and hit the Update button.
  3. Delete a Partner Contact:
    • In the left navigation, click on Manage Partners>Manage Partner Contacts.
    • Click on the Delete button in the Action column.
  4. Activate a Partner contact by checking the checkbox given in the Active Column of the Partner Contacts table.
  5. Search a Partner Contact by searching the First or Last Name and hitting the Search Button.

© 2025 Successful Channels Inc.